OCR 結果を画面に表示する
検出・認識した結果の位置とテキストを画面に表示する方法を説明します。
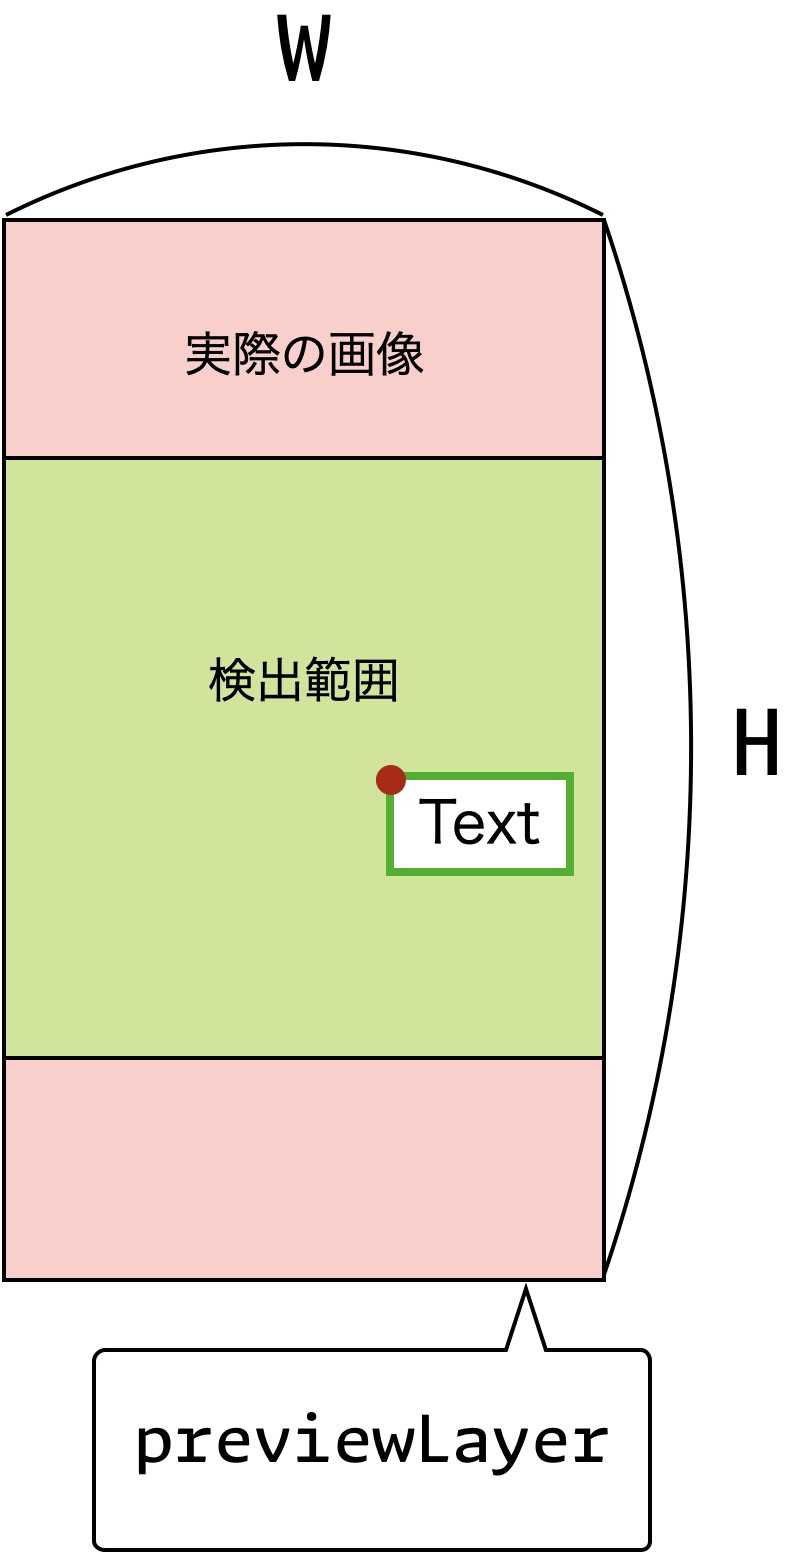
SDK が解析する画像の範囲
scan が解析する範囲は、指定したモデルに依存します。ここでは model-d320x320 を例に説明します。
モデルはインプットとして受け取る画像のアスペクト比を持っています。model-d320x320 では 320x320(width x height) のアスペクト比の画像を想定しています。
モデルが想定するアスペクト比と異なる画像が渡された場合、SDK は画像の一部(デフォルトでは中心部分)を切り取ってモデルに渡します。横幅はインプット画像の幅を基準とし、モデルのアスペクト比を保つように縦幅を算出します。
たとえば入力画像のサイズが 360x720 の場合、モデルに渡される画像は横幅 360、縦幅 360 * 320 / 320 = 360 となります。
入力画像のアスペクト比をモデルの入力サイズのアスペクト比に揃えると、パディングが発生せず入力画像全体が解析対象となるため、検出精度が向上します。たとえば model-d320x320 を使用する場合は、入力画像も 1:1 のアスペクト比に近づけるのが効果的です。
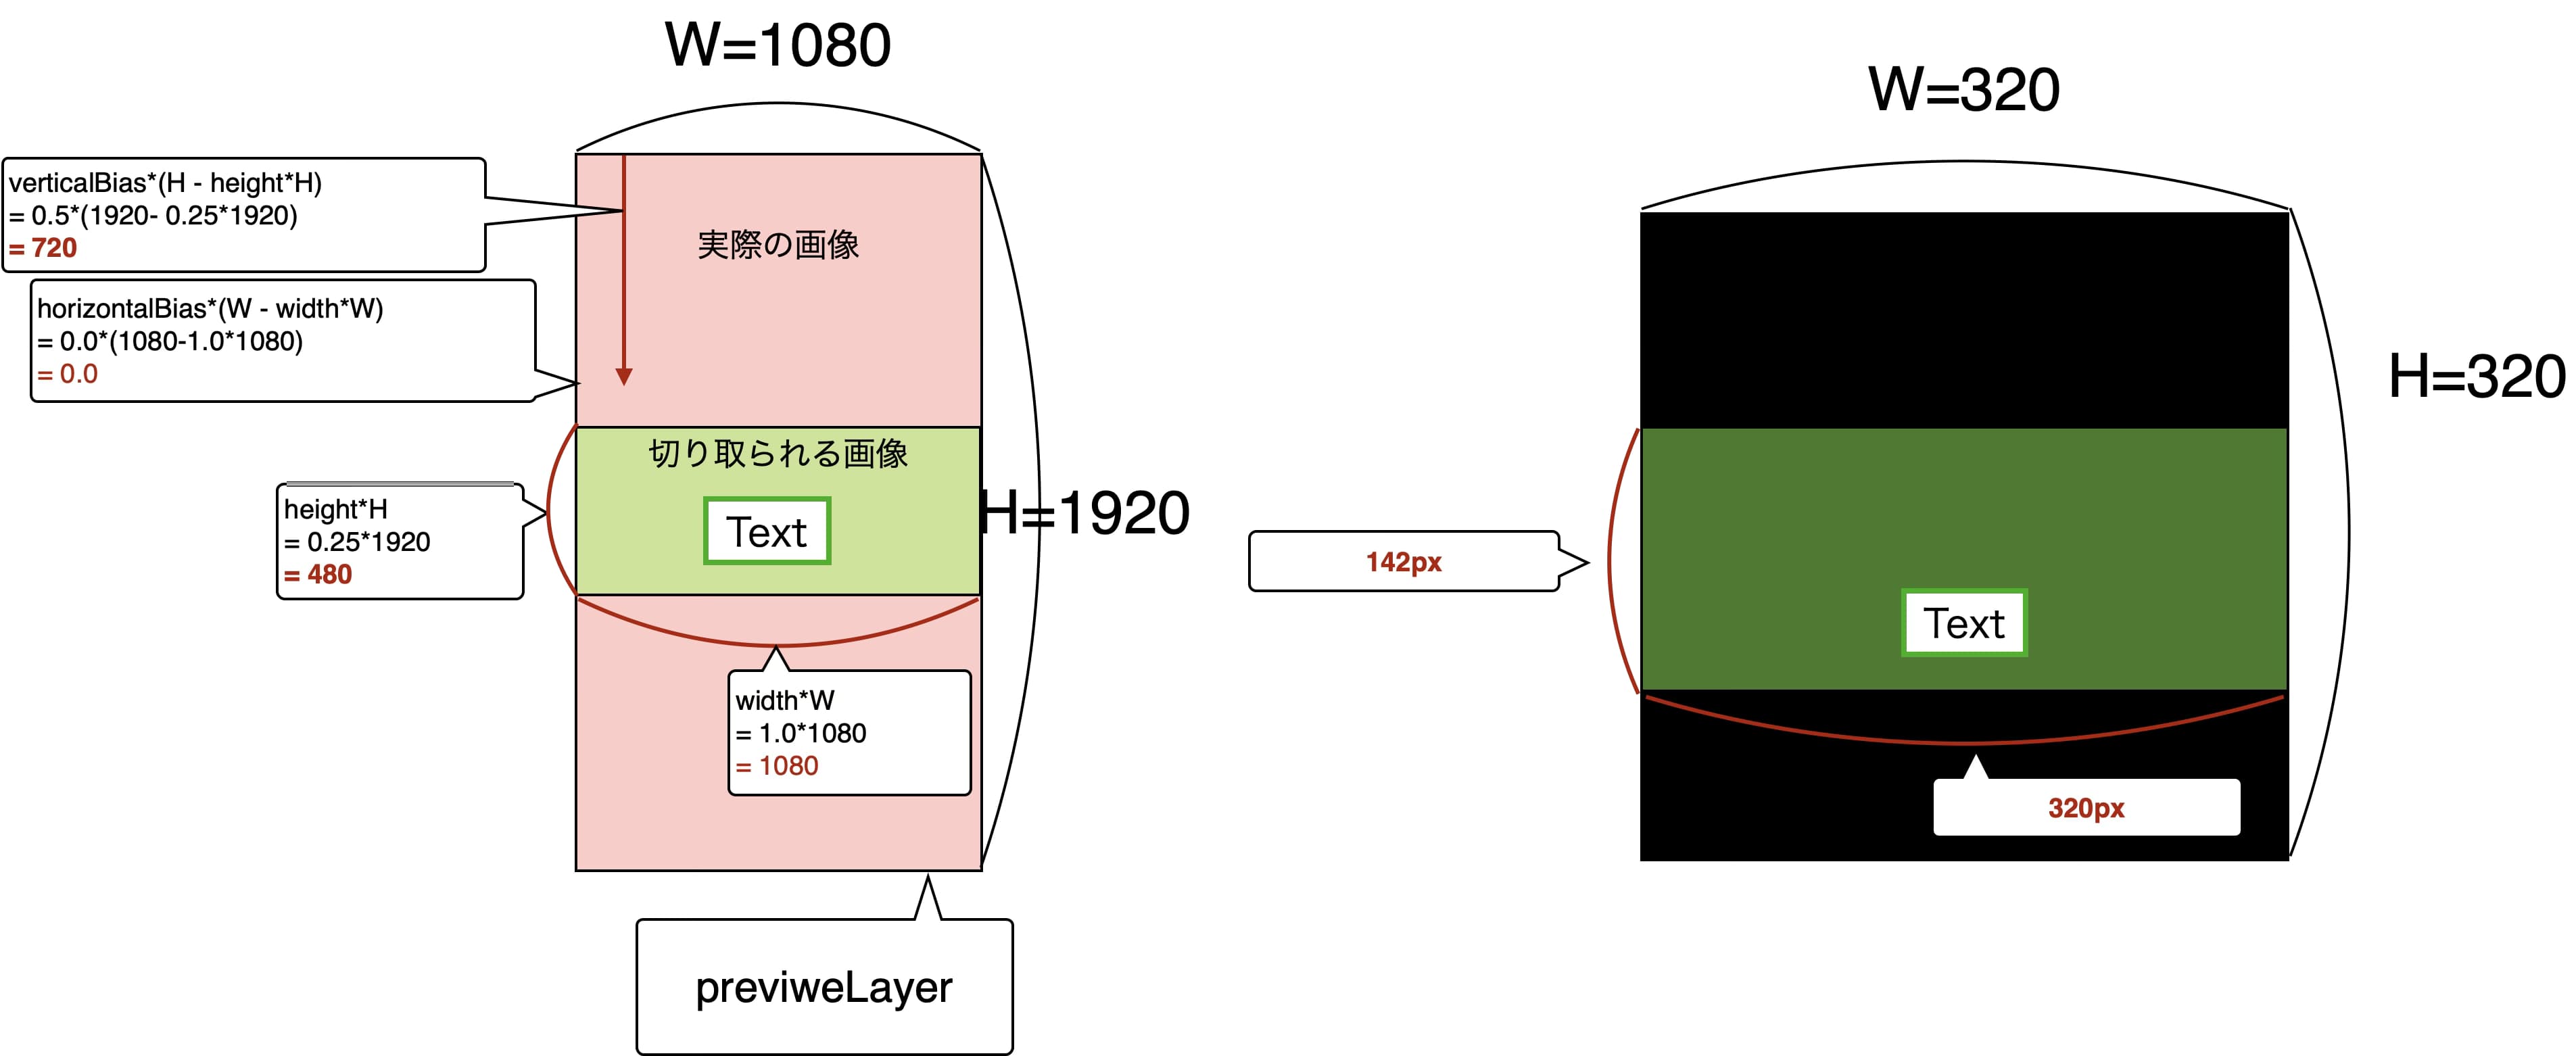
たとえば、画面全体のサイズが 1080x1920 で、そこから中心 1080x480 をクロップして EdgeOCR に渡した場合、クロップした画像のアスペクト比は 1080:480 = 1:0.44 となり、リサイズされたあとの画像は 320x142 になります。モデルの入力サイズのアスペクト比は 1:1 なので、縦方向に黒くパディングが入ります。
実行時間としては、1080x1080 の画像を処理する場合と、1080x480 を処理する場合で大きな差はありませんが、パディングされた部分は解析対象外となるため、1080x1080 の画像を渡す方が精度が高くなる可能性があります。
検出結果の座標
Detection の getBoundingBox メソッドで得られる座標は、scan に入力した画面領域の縦・横を 1 に正規化した相対座標です。
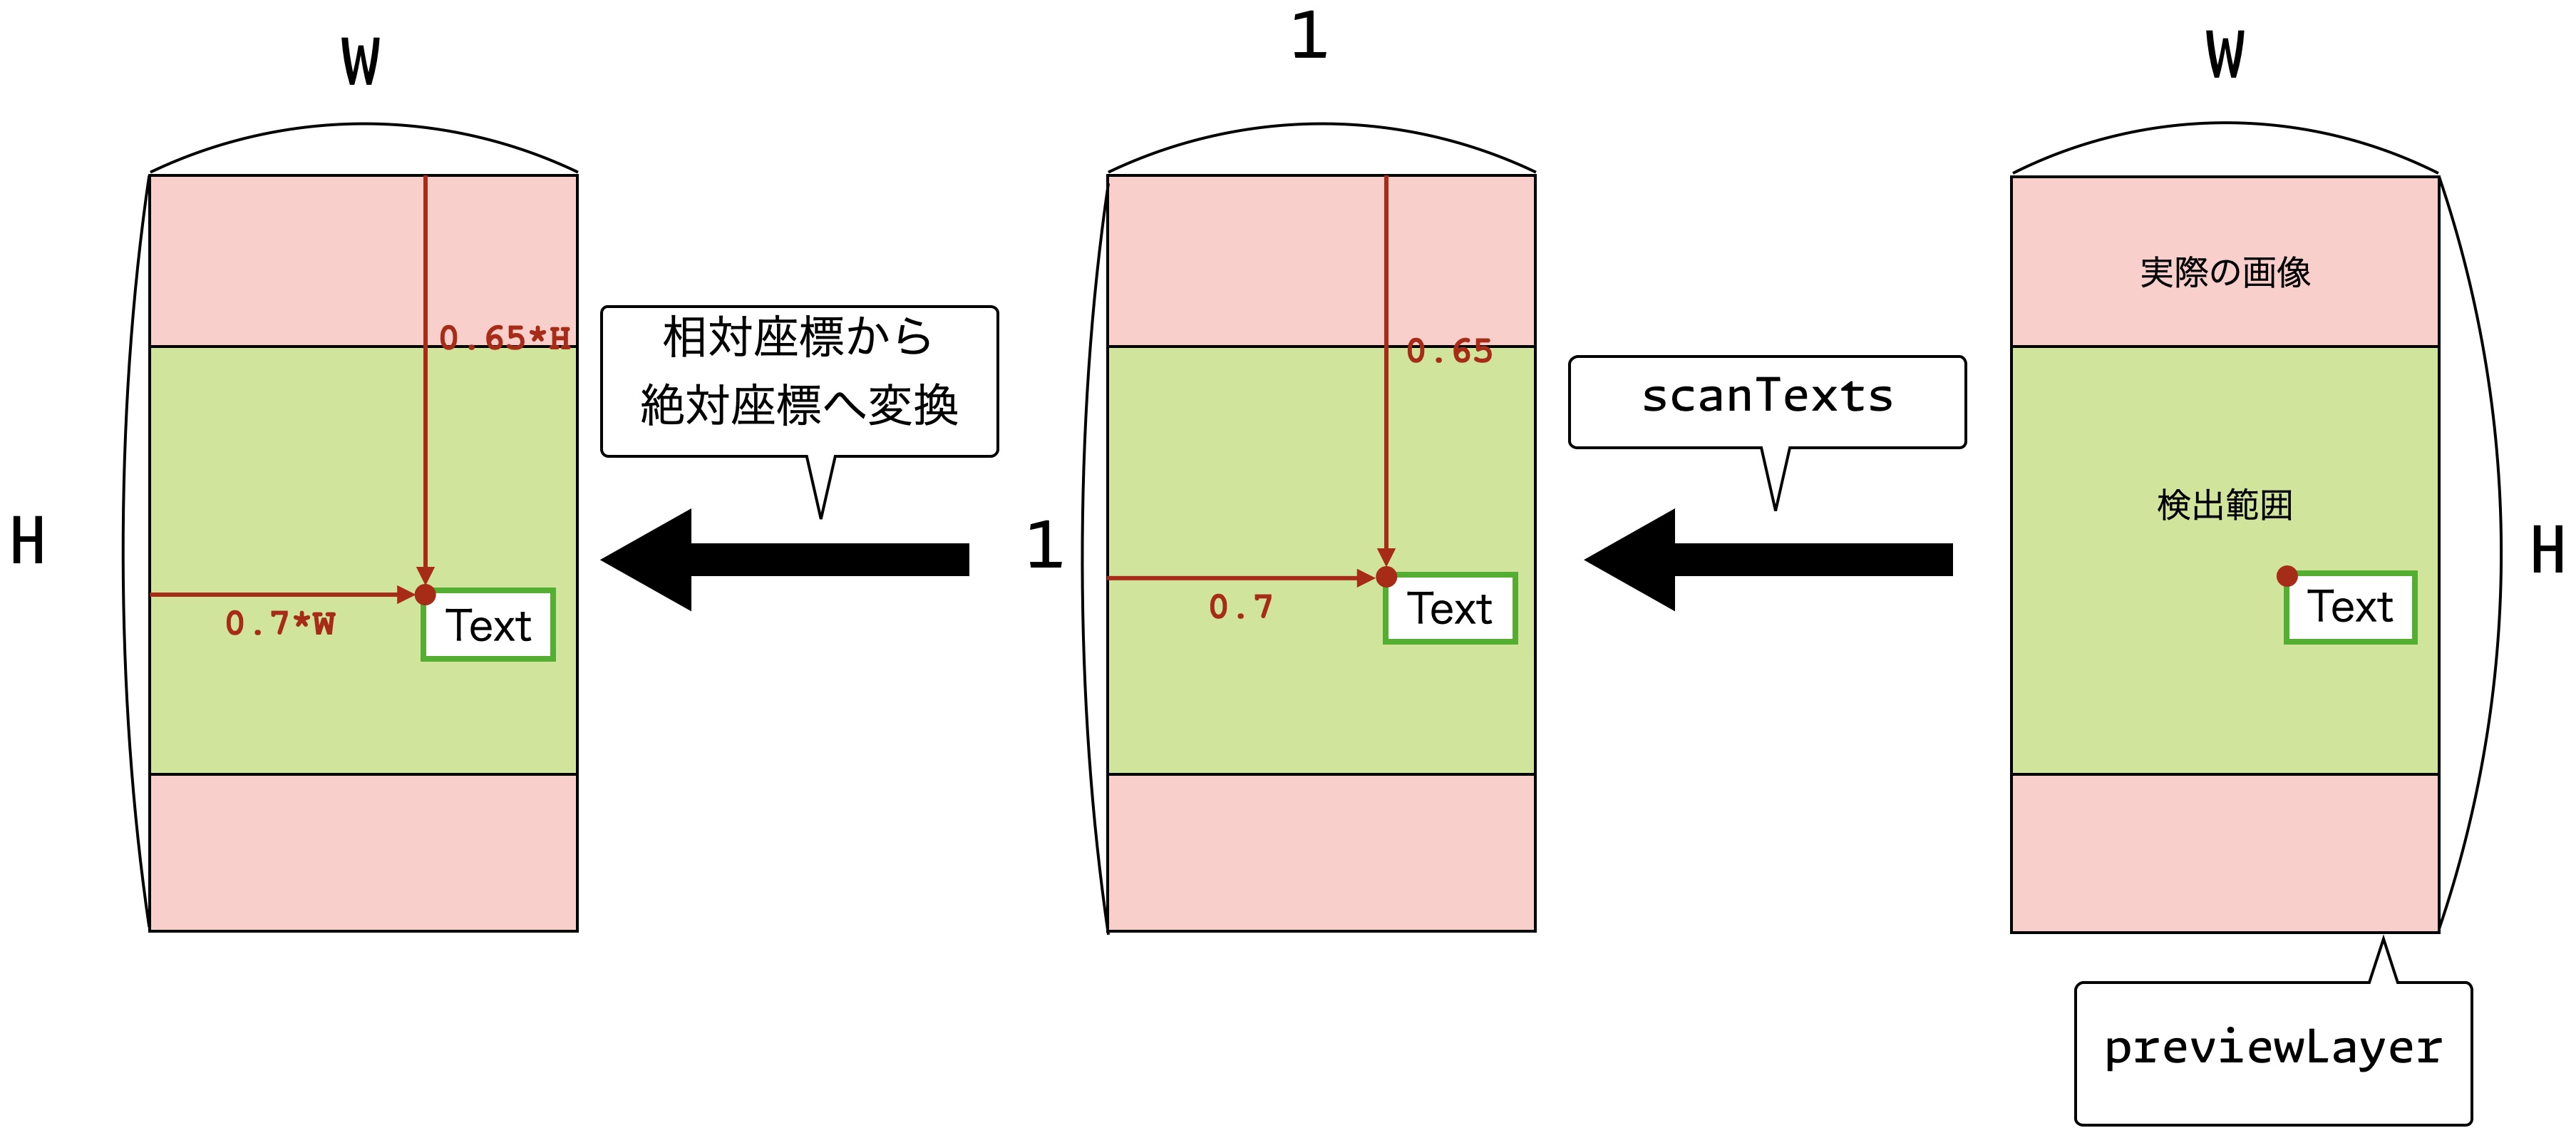
絶対座標への変換は、相対座標に画面領域の幅・高さをそれぞれ掛けることで行います。
実装方法
- iOS (Swift)
- Android (Java)
検出結果表示レイヤーの設定
detectionLayer(検出結果を描画するレイヤー)と guideLayer(スキャン範囲を示すガイド枠)を設定します。
override func setupLayers() {
    let width = viewBounds.width
    let height = viewBounds.width * CGFloat(aspectRatio)
    let cropHorizontalBias = 0.5
    let cropVerticalBias = 0.5

    guideLayer = CALayer()
    guideLayer.frame = CGRect(
        x: cropHorizontalBias * (viewBounds.width - width),
        y: cropVerticalBias * (viewBounds.height - height),
        width: width,
        height: height)
    guideLayer.borderWidth = 3.0
    guideLayer.borderColor = UIColor.green.cgColor

    detectionLayer = CALayer()
    detectionLayer.frame = viewBounds

    DispatchQueue.main.async { [weak self] in
        if let layer = self?.previewLayer {
            layer.addSublayer(self!.detectionLayer)
            layer.addSublayer(self!.guideLayer)
        }
    }
}
検出結果の描画
相対座標から絶対座標へ変換し、バウンディングボックスとテキストを描画します。
func drawDetections(result: ScanResult) {
    CATransaction.begin()
    CATransaction.setValue(kCFBooleanTrue, forKey: kCATransactionDisableActions)
    detectionLayer.sublayers = nil
    for detection in result.getTextDetections() {
        let text = detection.getText()
        if !text.isEmpty {
            let bbox = detection.getBoundingBox()
            drawDetection(bbox: bbox, text: text)
        }
    }
    CATransaction.commit()
}

func drawDetection(
    bbox: CGRect,
    text: String,
    boxColor: CGColor = UIColor.green.withAlphaComponent(0.5).cgColor,
    textColor: CGColor = UIColor.black.cgColor
) {
    let boxLayer = CALayer()
    let width = detectionLayer.frame.width
    let height = detectionLayer.frame.height
    let bounds = CGRect(
        x: bbox.minX * width,
        y: bbox.minY * height,
        width: (bbox.maxX - bbox.minX) * width,
        height: (bbox.maxY - bbox.minY) * height)
    boxLayer.frame = bounds
    boxLayer.borderWidth = 1.0
    boxLayer.borderColor = boxColor

    let textLayer = CATextLayer()
    textLayer.string = text
    textLayer.fontSize = 15
    textLayer.frame = CGRect(x: 0, y: -20, width: boxLayer.frame.width, height: 20)
    textLayer.backgroundColor = boxColor
    textLayer.foregroundColor = textColor

    boxLayer.addSublayer(textLayer)
    detectionLayer.addSublayer(boxLayer)
}
CameraOverlay の配置
SDK に含まれている CameraOverlay を使うことで、OCR 結果の表示やスキャン範囲外のホワイトアウトを簡単に実装できます。
レイアウト XML で PreviewView の上に同じサイズの CameraOverlay を配置します。
<com.nefrock.edgeocr.ui.CameraOverlay
    android:id="@+id/camera_overlay"
    android:layout_width="0dp"
    android:layout_height="0dp"
    app:layout_constraintTop_toTopOf="@+id/previewView"
    app:layout_constraintBottom_toBottomOf="@+id/previewView"
    app:layout_constraintStart_toStartOf="@+id/previewView"
    app:layout_constraintEnd_toEndOf="@+id/previewView" />
モデルアスペクト比の設定
CameraOverlay にモデルのアスペクト比を設定することで、スキャン範囲外をホワイトアウトします。
float modelAspectRatio = getIntent().getFloatExtra("model_aspect_ratio", 1.0f);
cameraOverlay = findViewById(R.id.camera_overlay);
cameraOverlay.setAspectRatio(modelAspectRatio);
OCR 結果の表示
CameraOverlay の setBoxes メソッドに検出結果を渡すだけで、OCR 結果が表示されます。
imageAnalysis.setAnalyzer(analysisExecutor, image -> {
    if (!api.isReady()) {
        image.close();
        return;
    }
    try {
        ScanResult scanResult = api.scan(image);
        List<Text> detections = scanResult.getTextDetections();
        cameraOverlay.setBoxes(detections);
    } catch (EdgeError e) {
        Log.e("EdgeOCR", "Failed to analyze image", e);
    } finally {
        image.close();
    }
});